Cubic-S – how does the optional safety module on Kawasaki Robotics robots work and what is its purpose?
In this article you will learn:
- what Cubic-S for robots from Kawasaki Robotics is,
- why and for what purpose it is used,
- what safety features can be selected when using Cubic-S.
Figure 1 Cubic-S: safety module for robots from Kawasaki Robotics
The Cubic-S module in Kawasaki Robotics robots is responsible for ensuring safety by monitoring the robot’s motion and stopping it in the event of unauthorised movement. Cubic-S is characterised by its easy and quick configuration of safety functions.
Remember that Cubic-S:
- can operate in manual and automatic mode depending on the configuration,
- is the master module,
- will work in almost all applications where:
- robots cooperate with humans,
- the working area of the robot is limited and there are narrow workspaces,
- are used dangerous tools, e.g. laser beam.
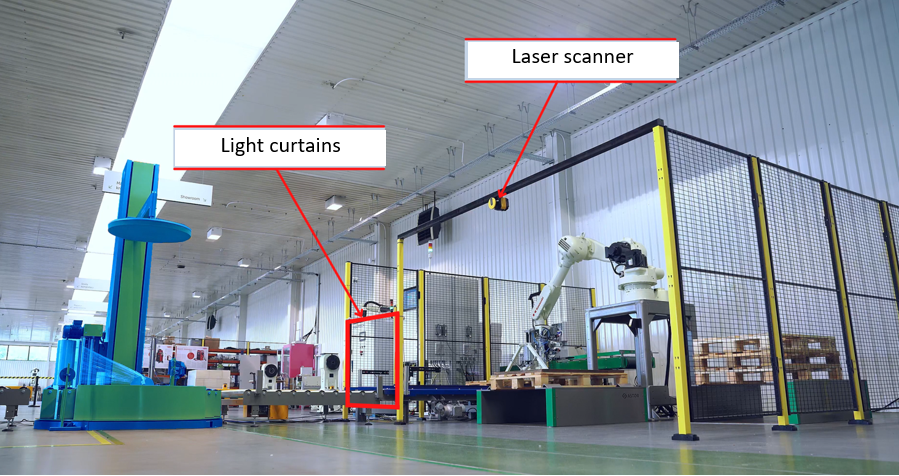
Figure 2. Kawasaki Robotics workstation with Cubic-S module installed
The picture shows an example of a Kawasaki Robotics robotic station with the Cubic-S module. The laser scanner and light curtain are marked on the picture. The laser enables monitoring of the MiR ( Mobile Industrial Robot ) robot’s entry to pick up the pallet from the station.
This laser is able to distinguish that someone is entering the work area. When a mobile robot enters the area, the workstation can operate normally, but when a human enters the area, the entire work cycle stops immediately. No grating or fencing is needed for Cubic-S to work.
The light curtains are located on the left side of the station – where the roller conveyor is located. This curtain intercepts and stops the entire process when a person enters the area.
Learn how to install the Cubic-S safety module for Kawasaki Robotics robots:
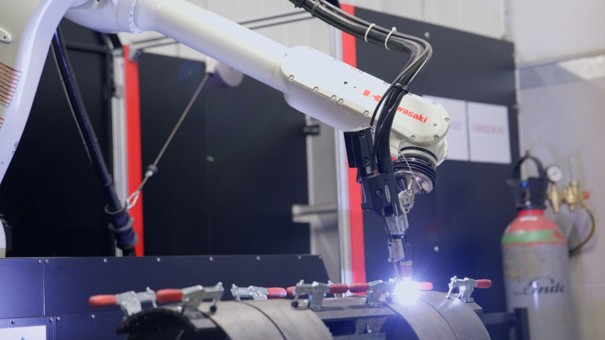
*Additionally, in the video below you can see the application of Cubic-S:
https://www.youtube.com/watch?v=_I6yjCbYajI
Choosing the Cubic-S option for Kawasaki Robotics robots provides greater safety when working with these devices. Please note that this option is master to all other modules. What does that mean? If
a person enters the danger zone, the Cubic-S module will be able to react faster than a human operator at the station by pressing the emergency stop button. This is why there is so much added value in selecting this option already at the robot selection stage.
There are 8 safety functions to choose from in the Cubic-S safety module. The some functions can be activated or deactivated depending on the safety inputs and outputs (there are 12 of them; eight are configurable, while four have permanently assigned functionalities), as well as independently of them.
8 safety functions of Cubic-S for Kawasaki Robotics robots:
-
Cubic-S: function for monitoring the robot’s movement space.
The function of monitoring the area of robot movement allows to determine the space in which the work of the robot is allowed or not. Points and lines of robot arm components are as well as items related to the tool are taken into account.
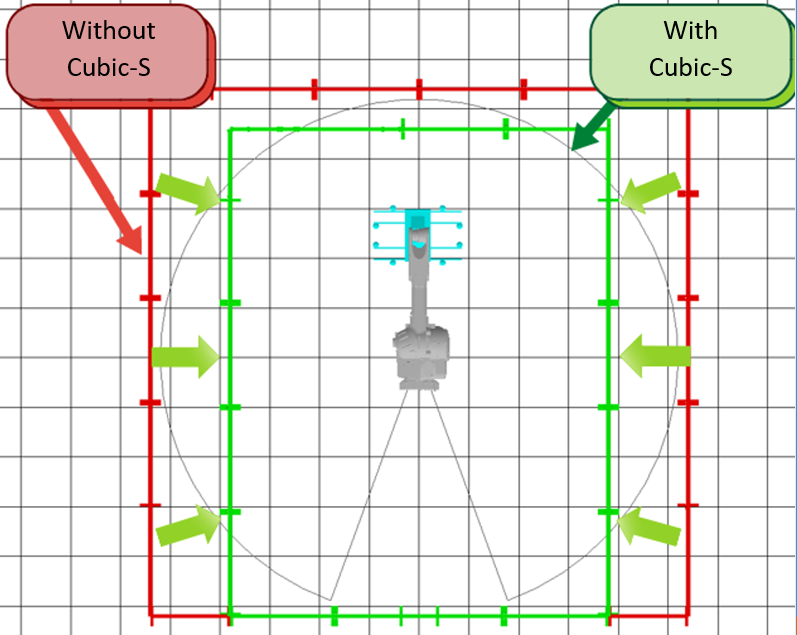
Figure 3. Cubic-S: Kawasaki Robotics robot space monitoring function
Two options are presented on one picture. The first one on the right using the Cubic-S module, with the area marked in green and additional arrows drawn, and the one on the left in red: without Cubic-S installed. As you can easily see, when using the Cubic-S option, you can significantly reduce the working area of the robot, making its implementation and cooperation with other machines easier.
-
Cubic-S: joint monitoring function
This function allows you to specify limits for individual robot joints. When the limit value is exceeded, i.e. when it reaches the joint limit, the Kawasaki Robotics robot is brought to an emergency stop and there is no need for an additional zone limit switch. It is possible to limit the movement of each axis separately.
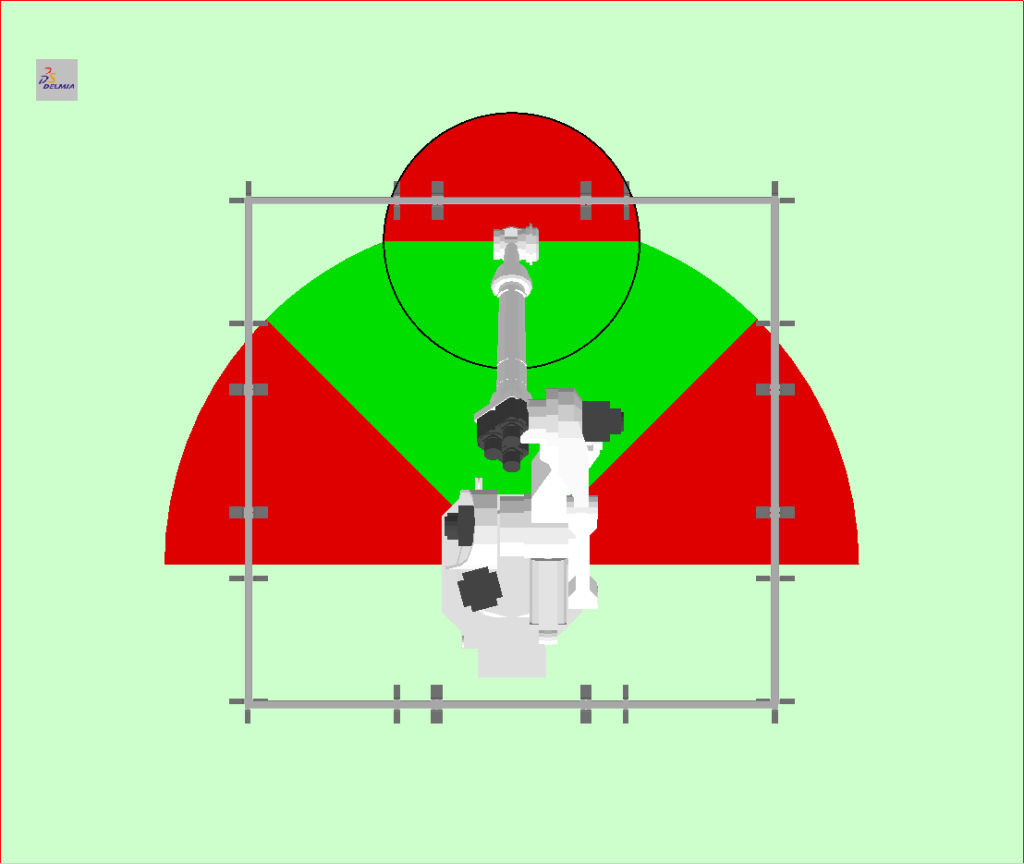
Figure 4. Cubic-S: Joint monitoring function
The picture shows the 1st and 6th axis in a Kawasaki robot. The area of rotation of the first axis, indicated by the larger semicircle, is limited and the robot can only work in the green angle. The rotation area of the sixth axis, marked with a small circle, shows that the robot can operate at
a maximum angle of 180 degrees. With this function you can therefore limit the rotation angle of individual axes. With Cubic-S, each axis can be individually configured instead of using mechanical stoppers.
-
Cubic-S: speed monitoring function
With this option you can check the robot’s speed relative to the TCP (Tool Center Point). If a sudden change in speed occurs, the Cubic-S module will stop the Kawasaki Robotics robot in an emergency mode.
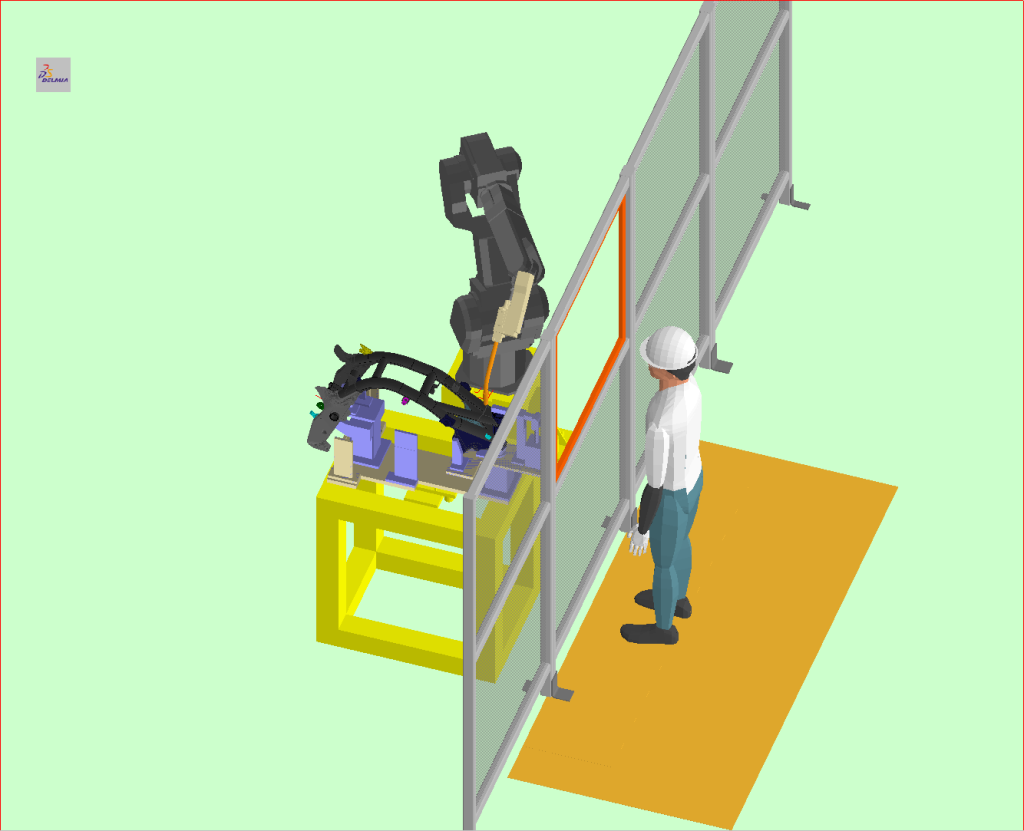
Figure 5. Cubic-S: Speed monitoring function in Kawasaki Robotics robots
The illustration shows a safety mat (orange rectangle) – this is where the speed control function is activated.
-
Cubic-S: stop monitoring function
This functionality allows you to control whether the Kawasaki Robotics robot or its auxiliary axis is not moving. In the event of any movement, the power supply to the robot drives is immediately cut off and the brakes are applied.
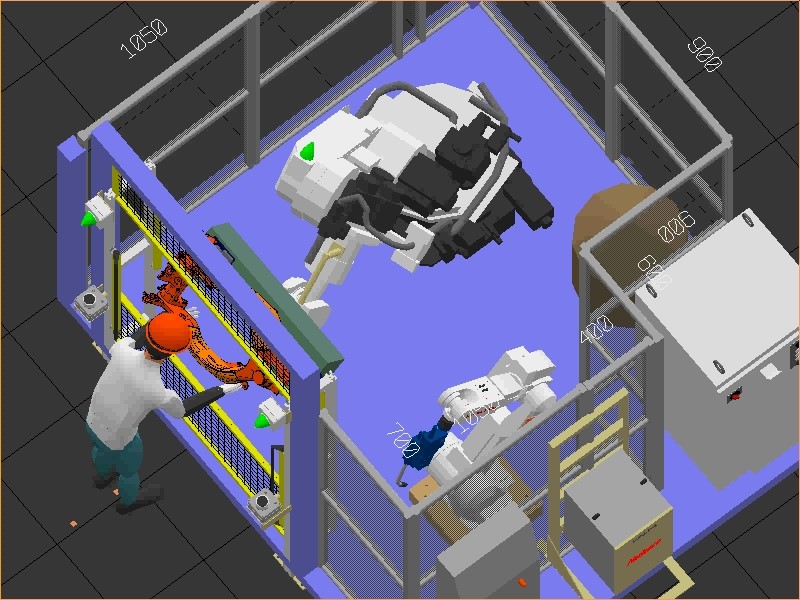
Figure 6. Cubic-S: Stop monitoring function
A good example is the simulation of robotic station as shown in the figure. At the moment of the workpiece change, when the operator enters the robot’s working area, i.e. crosses the light curtain, the Cubic-S module monitors whether the robot starts to move – and if it does, the module stops the robot.
-
Cubic-S: tool orientation monitoring function
By using this option it is possible to check tool orientation. A good example is a fitted tool for waterjet cutting or laser welding, wherever the operation requires a beam of a particular medium.
If the permitted tool displacement angle is exceeded, the robot is brought to an emergency stop. Five tool orientation ranges can be defined. This makes it impossible to direct the tool towards the operator or away from the work area.
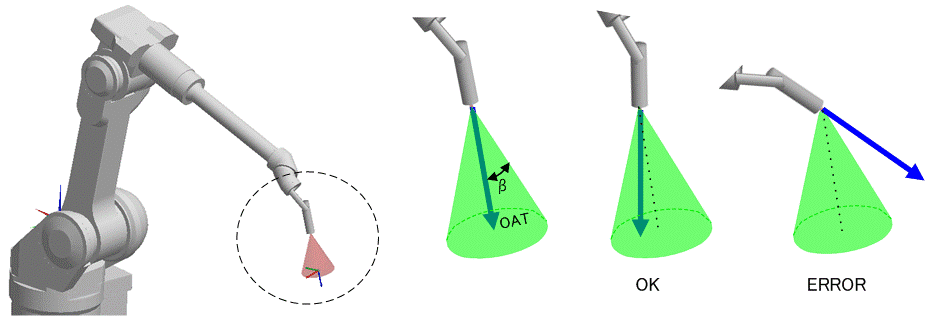
Figure 7. Cubic-S: Tool orientation monitoring function
The image shows a robot with a tool mounted on the end of its arm that uses an incident stream/beam, and if the tool swings out too far it can cause danger. It is therefore necessary to limit the angle so that the tool does not move outside the field defined in relation to the tool coordinate system.
The images show the shape of the defined area and the monitoring by Cubic- S (green cone), of the stream/beam (blue arrow). When the stream is inside the cone, as in these first two illustrations – the situation is acceptable, but when it goes outside it, an error arises, as in the last figure presented. When the beam goes outside the Cubic-S area, the Kawasaki Robotics robot stops immediately.
-
Cubic-S: protective stop function
Cubic-S can be combined with external security devices such as curtains and lasers. This allows the Kawasaki Robotics robot to be stopped in 3 different ways.
The protective stop can operate independently in manual and automatic mode. A category “2” stop is permitted, which means that when this protective stop is triggered the robot will decelerate and enter the stop monitoring status.
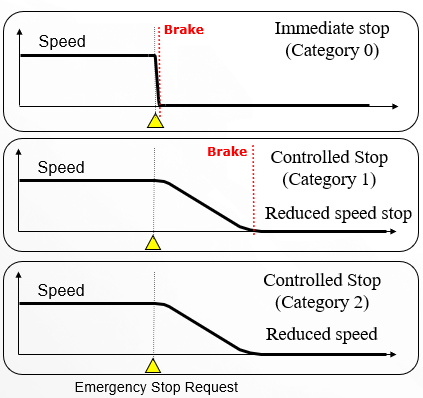
Figure 8. Cubic-S: Protective stop function
The picture shows three ways of stopping the robot:
“0” – the power supply to the motors is disconnected, and the brakes are applied.
“1” – controlled stopping, followed by switching off the engines and applying the brakes.
“2” – controlled stop, then the robot is maintained in STOP status monitoring mode without applying the brakes. This allows to resume the process.
-
Cubic-S: emergency stop function
This function is compatible with the emergency stop circuit. It stops the robot immediately upon receiving an input signal. This cessation of robot operation can occur in two ways. When you want to restart the robot, it is not enough to disable the emergency stop signal, you must additionally reset the error.
“0” – the power supply to the motors is disconnected, and the brakes are applied.
“1” – controlled stopping, followed by switching off the engines and applying the brakes.
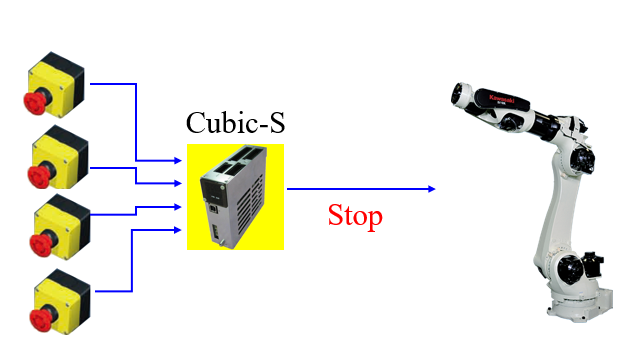
Figure 9. Cubic-S: Emergency stop function in Kawasaki Robotics robots
The picture shows the emergency stop button. After pressing this button, the Kawasaki Robotics robot is stopped immediately.
-
Cubic-S: safety state output function
It is possible to output safety outputs depending on the status of the 1-7 Cubic-S functions and safety inputs described above. The safety output function can control external devices, e.g. a bolt, and can send signals to the Safety PLC.
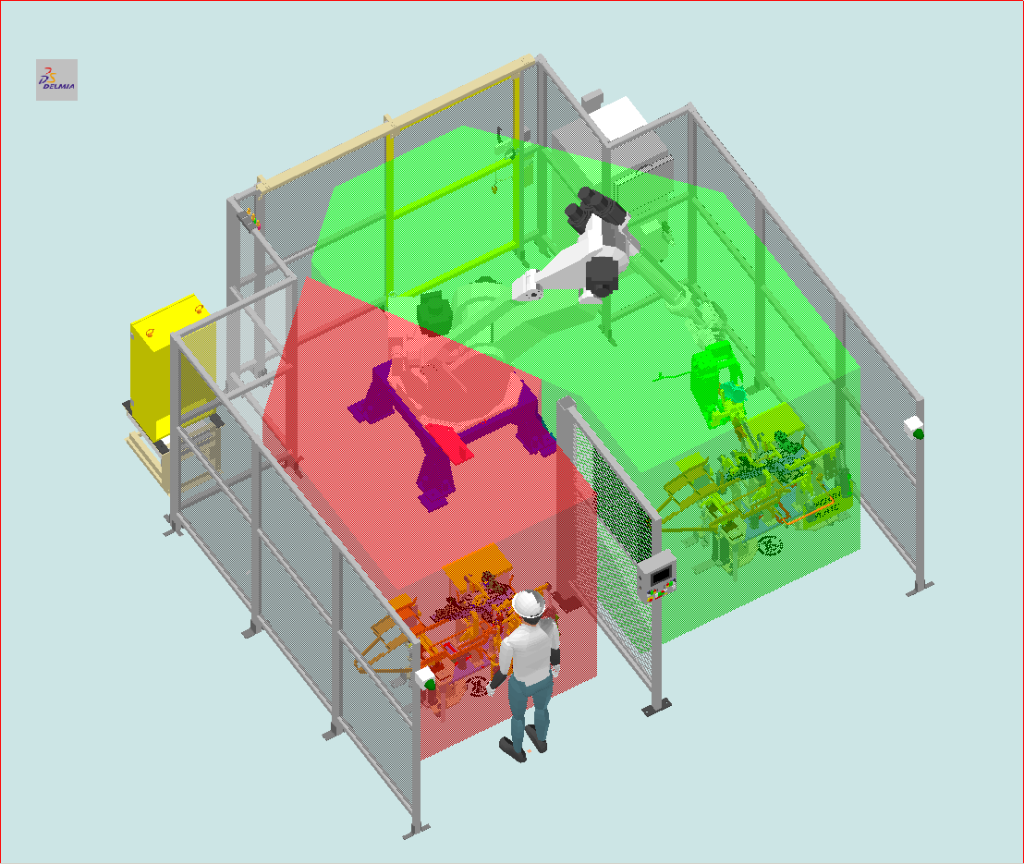
Figure 10. Cubic-S: Safety state output function
Cubic-S zone management can conditionally enable or disable a zone in which the robot can or cannot move. The figure shows that the operator has crossed the curtain of the first station, that is the forbidden area for the robot. Should the robot try to make a move there, the Cubic-S will stop it in this zone.
It is worth remembering that the robot will not change the robot’s trajectory – if an area on its path has been marked as forbidden, the robot will be stopped.
Summary
There are 8 safety functions to choose from in the Cubic-S module. The functions can be activated or deactivated depending on the safety inputs and outputs. Choosing appropriate Cubic-S options for Kawasaki Robotics robots provides greater safety when working with these devices. Please note that this option is a master module to all other modules.
In the following article you will expand your knowledge of IP54 protection ratings for controllers used in Kawasaki Robotics robots.
Author:
Klaudia Rzeszowska
Source:
*The film created based on material prepared by the Italian distributor Kawasaki Robotics
ASTOR and Kawasaki Robotics CEE HUB internal materials